Zoom's host controls assist you in conducting a class or meeting.
This article covers the following topics:
Conducting a Zoom Class Session or Meeting
After starting your Zoom meeting, test your speaker and microphone, then click "Join with Computer Audio." By default, your audio and video will be off.

After joining the session with your audio, you can start your video by clicking the camera icon in the bottom menu.

The three most common technical issues with any videoconferencing software are:
- Participants cant see
- Participants cant hear
- Background noise and mic feedback
To help troubleshoot these issues, test your computer or device's video and audio connection. Here are a few additional troubleshooting tips:
- If you lack a headset or a computer camera, use your smartphone and earbuds with the Zoom app, downloadable from the iOS and Google Play app stores.
- If your camera is unnecessary, turn it off to improve slow connections or delays.
- If your computer audio isn't working well, try calling the videoconference using the phone number provided in the Zoom invite.
- Follow our best practices for video conferencing to ensure a quality experience.
Consider running a test meeting beforehand to familiarize yourselves with Zoom, and test your microphone/speakers and video before hosting or joining a meeting.
Host controls allow you to control the class session or meeting. You can access these controls from the Zoom menu at the bottom of your meeting screen.

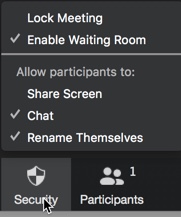
The Security button provides privacy and security options for your meetings. You can use it to enable a waiting room and lock the meeting after it starts. Additionally, you can allow participants to screen share, chat or rename themselves. Chat is particularly useful for participants to ask questions, share links or report technical issues.
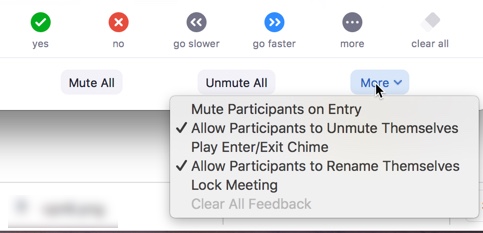
Clicking on Participants reveals a list of attendees, where you can mute or assign co-host roles. The Participants window will appear at the bottom of the screen; you can mute all participants. You also have options to allow participants to unmute themselves.
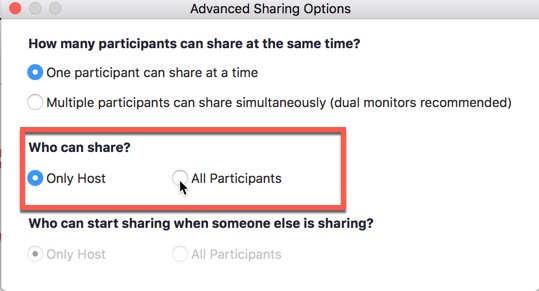
By default, only the host can share their screen. Clicking the Share Screen button offers various options, including sharing your entire screen, a presentation for your class, using a whiteboard, and more.

To enable screen-sharing for your students or attendees, click the arrow to the right of the "Screen Sharing" icon, choose "Advanced Sharing Options," and select "All Participants."
If you have a guest speaker or a specific student presenter, you can also use the Participants button to make them a Co-host so they can share their screen.
If an unwanted external participant joins your meeting, you can remove them:
- Click the participant
- Click the "More" button
- Select the option to remove
Choose to record your meeting to either the cloud or your computer. For easy sharing, we recommend recording to the cloud. After processing (which may take several hours for long recordings or during peak periods), you'll receive an email with a link to access the recording. Detailed instructions on accessing and sharing your recordings are available:
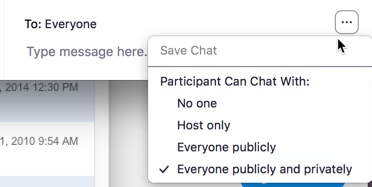
From the bottom menu, you can chat with meeting participants. To the right of the chat, click the 3-dot button to choose whether participants can chat with only the host or with everyone publicly.
For faculty interested in having students conduct group meetings during class, Zoom allows you to set up breakout rooms. You can assign students or attendees to breakout rooms ahead of the meeting or during the meeting. If you have a lot of attendees, allow ample time for this process.
You can also utilize the polling option during your sessions. We recommend setting up the polls in advance rather than during the meeting. Faculty may view poll results in the reports provided by the Canvas Zoom integration.
For further Zoom help and resources, visit the Zoom Help Center.